Contents
Catalog synchronisation is a process of syncing the contacts and appointments from an external source into the Puzzel catalog. This provides the agent with a view of all available contacts and appointments. While it is possible to manually add the contacts in the Admin portal, it would be easier to sync the appointments and contacts automatically at regular intervals. This facilitates the user to have an up to date roster at all times.
Puzzel has developed an application for syncing contacts and calendars into the Puzzel Catalog, which is hosted in Puzzel's environment. Contacts can be retrieved from the Active Directory, while calendars can be retrieved from different sources.
The Catalog Sync is installed in the customer's environment and sends data to Puzzel over an encrypted connection using HTTPS. Throughout this document, the application may be referred to as Puzzel Catalog Sync or simply the Sync Client.
This feature is only for pure cloud Azure Active Directory environments.
The Sync Client is available as an .msi file that you can download here:
Puzzel Catalog Sync for Azure version 1.2.0 or later uses the latest Microsoft Graph API and the new Puzzel authentication service. We encourage all our existing customers to download the Sync Client version 1.2.0 or later and make the necessary changes in the Azure environment that you will find on the
Permission setup section.
- .Net Framework 4.7.1 or newer
- Windows Server 2012 or newer
The Catalog Sync Client is an installed windows service. To install the client, double click on the installer file (.msi) provided to bring up the setup wizard. The welcome screen of the wizard looks as shown below.
Follow the steps explained below to successfully install the Sync Client:
- Click Next on the welcome screen to start the installation process.
- You can either save the installed files in the default folder recommended or choose a custom location to save it and click Next.
- Click on the Install button to start the installation.
The progress of the installation can be seen on the status bar.
- Click on the Finish button to complete the process.
After successful installation, the files will be saved in the folder chosen during the process.
Furthermore, a new windows service will be registered which can be seen in the services window.
A X.509 trust certificate is necessary for the client to be authenticated with Azure. This can be generated using Puzzel Certificate Tool that comes packaged with the installers. The certificate is be placed in the cert folder of the Sync Client and must also be trusted by the system the client is running on.
If you are using a public certificate issued by the CA, then you can save it in the cert folder as mentioned above. However, if you are generating a private certificate using the Puzzel Certificate Tool, then follow the steps detailed in this section.
To generate a certificate using Puzzel Certificate Tool, do the following:
- Open the Puzzel Certificate Tool by clicking on it.
- Enter a Certificate name and a valid start/end date to the certificate and click on the Generate button. A message will be displayed to confirm the successful creation of the certificate. Click OK to close this window.
- You can now find the new certificate listed in the drop-down menu of the Select certificate option. The new certificate will automatically be selected, and the certificate information will be displayed in the panel below. We will use this information to update Manifest of Azure application in the Application registration section.
- Press Export button to export the created certificate within .pfx container with a private key. Select the Output directory and enter a password to the certificate in the Export certificate window and click Export:
- Save the exported certificate in the cert folder of the Sync Client and make a note of the name and password of the certificate.
Some of the features in Puzzel’s Agent Application requires users to authenticate themselves in Azure AD. Follow the steps below which takes you through the process of configuring Puzzel Catalog Sync application in Azure AD. This is done as a two-step process as explained below.
Follow the procedure below to register Puzzel Catalog Sync in Azure AD:
- Go to Azure Active Directory and select App registrations. Click on New registration button.
- Enter the following three parameters in the Register an application window and click Register.
- Name - Choose a name for the application (e.g. Puzzel Catalog Sync)
- Supported account types – Choose the option that is most relevant to you. The recommended option is “Accounts in this organizational directory only (<directory name>)"
- Redirect URI (optional) – Choose Web and enter https://localhost
- Go back to the App registrations screen and select the app you just registered
- Click on Manifest option to edit the application Manifest. You need to edit the manifest of the Azure application by adding/editing an object in the current JSON:
Add or edit the “keyCredentials” element in the manifest JSON as shown below:
"keyCredentials": [
    {
      "customKeyIdentifier": "<Base64Thumbprint >",
      "keyId": "<key Id>",
      "type": "AsymmetricX509Cert",
      "usage": "Verify",
      "value": "<base64 Value>"
     }
  ]
The values to the "customKeyIdentifier", “keyId", "value" can be found in the certificate generated using the Puzzel Certificate Tool which you can read more about in the Generating a certificate section.
If the Sync Client version 1.2.0 or later is installed, add the following permissions as instructed below. You can find the latest version here.
- Go to https://portal.azure.com/, and open Azure Active Directory -> App registrations and select the application you just created.
- Select API permissions and click on Add a permission button.
- Select Microsoft Graph and choose the following permissions and Click Add permissions.
- User.Read.All
- User.Read
- Calendars.Read
- Directory.Read.All
- The following screen will appear prompting you to grant permission as an admin.
- The application will now have the required permissions.
- Open the Azure Catalog Setup Client that comes packaged with the installers. The below window opens up and General tab is selected by default. Choose the options here as required.
In the General tab, there are four parameters as explained below:
- Sync contacts only: If this option is selected, only contacts will be retrieved by the Sync Client.
- Sync contacts with no mailbox: If this option is selected, only contacts without a mailbox will be synced. However, if unselected, contacts with mailbox along with
calendar information will be synced.
This parameter is in addition to the filter that can be configured under contacts tab.
- Run updates every X minutes: This defines the frequency with which the calendar updates are requested for by the Sync Client.
It is always recommended that large organisations with a lot of contact information to sync less frequently to avoid the Sync Client being kept busy.
- Get data for X days ahead: This defines how many days into the future the Sync Client will retrieve calendar information when performing full sync.
- The Puzzel tab has four parameters to be set as defined below:
- URL: This is the URL of the Puzzel web services to send data to. Current URL value is https://api.puzzel.com/contactcentre5.
- Customer Key: This is the unique Customer ID of the Puzzel solution to sync the contacts and calendars to. This is the same Customer ID that is used to logon into the solution.
- User Name: This is the username of the account provided by the Puzzel Support team that is used to logon to the Puzzel API.
- Password: The password of the sync user provided by the Puzzel Support team.
A regular account does not have the permissions to do the sync operations.
- The Azure tab has two category of parameters, the details of which are explained below:
Contact Sync:
- Synchronize contacts at: You can select a time to sync the contacts once every day apart from the sync that happens at startup.
- Reset all data after contacts sync: If selected, a full calendar sync is performed after the daily contact sync.
AD Attributes:
- Company Domain: This is the domain of the organisation in Azure AD.
- Application GUID: The GUID of the application that was configured in Azure AD. This can be found upon clicking on App registrations in Azure AD and selecting the application created. See section Application registration.
- Windows Graph Url: The URL of the endpoint used for retrieving contacts.
- Windows Graph Version: The version of the Windows Graph used.
- Windows Login Url: The URL of the endpoint used to log on to Azure AD.
- Certificate Name: The name of the X.509 certificate used to log on to Azure AD. This certificate must be placed in the cert folder and must also be imported on the server that the Sync Client is running on. See section Generating a certificate.
- Certificate Password: The password of the certificate entered during creation. See section Generating a certificate.
- The Contacts tab has two categories of parameters that can be set as defined below:
Contacts:
- Query Filter: An optional filter that can be set when looking for contacts. By default, the sync client will retrieve all contacts based on the settings set in the “General” tab. More information about filters can be found here: https://learn.microsoft.com/en-us/graph/filter-query-parameter
- Add ConsistencyLevel header?: If checked, it will add a ConsistencyLevel header with “eventual” as value. This will enable advanced query capabilities of Microsoft’s Graph API. You can read more about advanced query capabilities from Microsoft here: https://learn.microsoft.com/en-us/graph/aad-advanced-queries
- External Contact ID: The unique ID that identifies the contact in the Puzzel catalog. A lookup for this ID is done every time the information is retrieved about a contact, to determine if a contact should be created, updated or deleted. If the External Contact ID changes in Azure AD, this will be interpreted as a new contact in the Puzzel catalog, resulting in a duplicate contact. The default External Contact ID is the userPrincipalName.
When doing large changes such as changes to the domain it is recommended to contact Puzzel support for removing duplicate data.
Contact Fields:
This is a list of the fields that will be retrieved for every contact from the Azure AD. The Mapping column is an index that corresponds to the mapping in Puzzel Catalog.
For more information about selectable fields on the user object in the Microsoft graph: https://learn.microsoft.com/en-us/graph/api/resources/user
The default settings of Sync Client matches the default field mapping of the Catalog. If the mapping needs to be changed in the Catalog, please contact Puzzel support.
- The Appointments tab options are as explained below:
- Replace BodyPreview: If checked, the BodyPreview of all appointments will be replaced by the configured text. This field can be left empty.
- Replace Subject: If checked, the Subject of all appointments will be replaced by the text specified here. This field can be left empty.
- Replace Location: If checked, the Location of all appointments will also be replaced by the configured text. This field can be left empty.
- Sync Tentative Appointments: If checked, all tentative appointments will also be synced. Otherwise these will be ignored during the sync process.
- Sync Private Appointments: If checked, all private appointments will also be synced. Otherwise, these will be ignored during the sync process.
Click Save to save all configurations. Press Cancel at any time to undo all configurations made.
To enable Teams presence with the Puzzel Catalog there are configurations that need to be done in in the Azure Sync Client and in the Puzzel Catalog as well as an App Registration for the Agent Application. You can follow this Help article to setup an App Registration for the Agent Application: https://help.puzzel.com/product-documents/integrations/puzzel-microsoft-teams-azure-authentication-setup.
It's required that two new fields, TenantId and ObjectId, are synced towards the Puzzel Catalog.
In the image below these two new fields are mapped to 12 and 13.
id - Mapping 12: This is the ObjectId of the contact and will be retrieved from the Microsoft Graph when it is synced.
“puzzel.com” - Mapping 13: For the TenantId the domain of the tenant is written in quotation marks. When a value is written in quotation marks it will be interpreted literally by the Sync Client. Instead of retrieving a value from the Microsoft graph it will insert this into the field that is uploaded to Puzzel. This value needs to be the same as the one that appears for the tenant in the Azure portal. As an example, if the domain of the Tenant is “exampletenant.com” then this configuration also needs to say “exampletenant.com”
Once these configuration changes are done please contact the Puzzel Support team and provide the mapping structure that is being used and the Support team will then make the necessary changes needed for the Catalog.
In addition to getting presence for the users in your own Azure AD tenant, it’s also possible to get presence for users from other tenants. The Microsoft Graph API has some limitations for getting presence, therefore there are some basic requirements:
-
The agent must have a guest user in the external tenant with the same e-mail address as the home tenant, and Azure AD must be configured as an identity provider for External Identities in the external tenant (default behaviour). Read more here: https://learn.microsoft.com/en-us/azure/active-directory/external-identities/b2b-quickstart-add-guest-users-portal
-
The guest user must have permission to use a multi-tenant Azure AD App Registration, which has API permission for reading the presence of all users in the external tenant.
-
The home TenantId and ObjectId of an external user must be imported into the catalogue
The following procedure will take you through the steps of configuring a multi-tenant App Registration in Azure AD. At the end of this process, you will be given an App ID URI, required by the Agent Application for authenticating the agents.
1. Setup Microsoft Teams App in Azure
Go to https://portal.azure.com and login with the Global Admin privileges for your domain. Choose “Azure Active Directory” from the list of featured apps.
2. Select App registrations
3. Click on the New registration option
4. Fill in the following 3 sections:
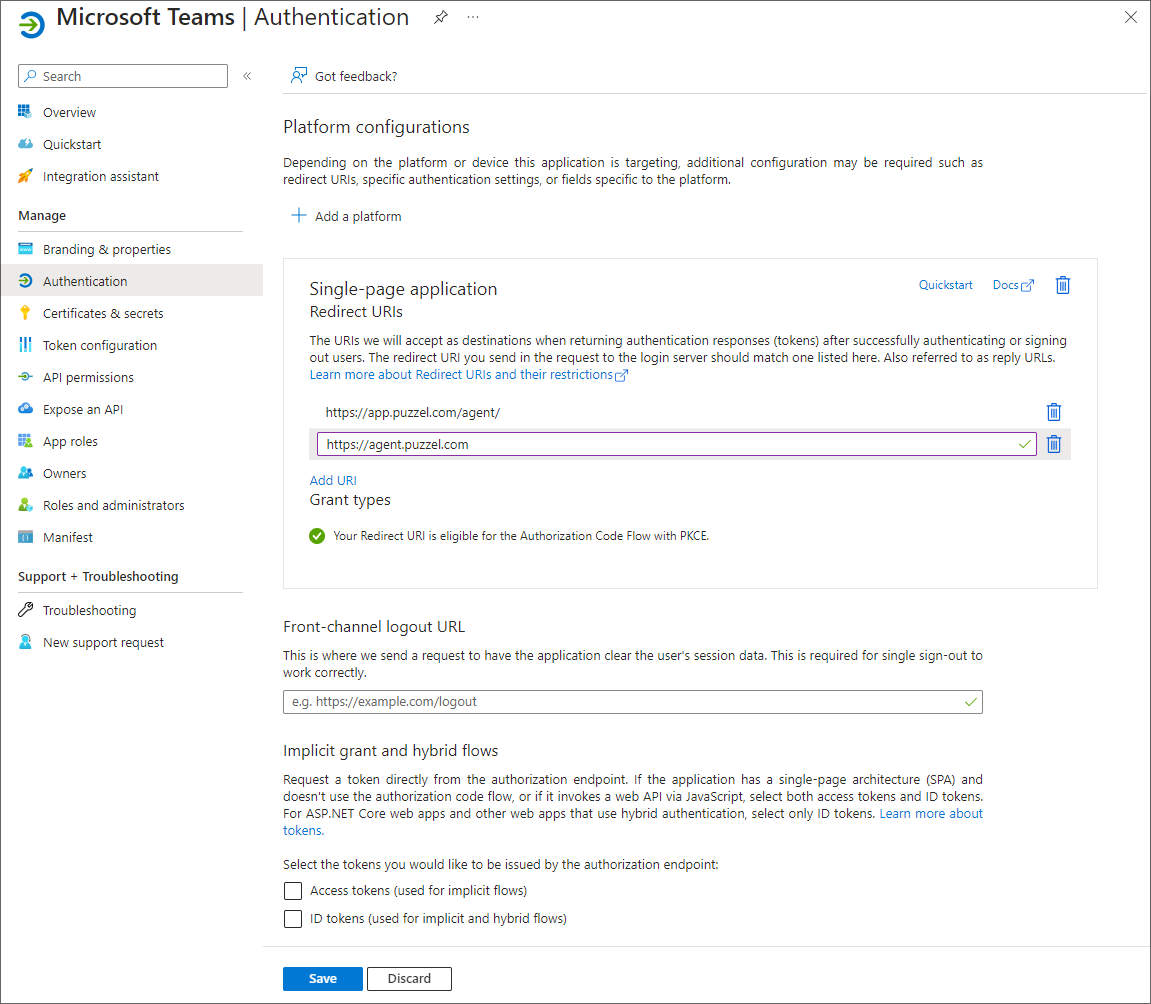
5. If you are not yet using the agent application with Puzzel ID you need to choose “Authentication” in the menu and add a Redirect URI. Add "https://agent.puzzel.com" OR "https://uk.puzzel.com/agent/" for UK.
6. This section will help you configure all the required permissions for Microsoft Teams App.
Add User and Teams presence permissions:
-
Choose API permissions, click on the Add a permission button and select Microsoft Graph in the right pane. Choose Delegated permissions and select User. Tick the User.Read check box.
-
Select Presence from the list and tick Presence.Read.All check box.
-
Click on Add permissions.
7. Click on the Grant admin consent for <directory name> and click Yes to confirm
There will be a “Successfully granted admin consent for the requested permissions” confirmation at the top of the screen.
Permissions must be granted this way by admins in every external tenant where the agent has a guest user.
The Application (client) ID mentioned in step 4 above must be entered in the property Enable Teams Presence for Catalog Contacts - Azure AD Multi-Tenant Application Id under Users -> Products -> Search in the Admin Portal. Please contact Puzzel Support if you require assistance.
