
Setting up an Auto work queue
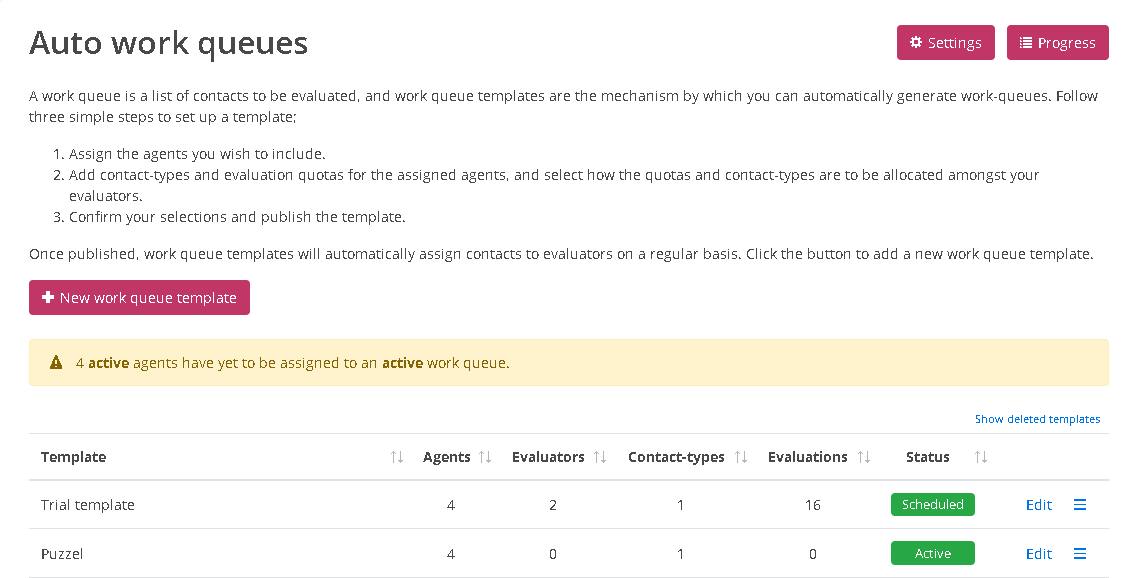
To set up an auto work queue:
- Go to Evaluate
- Click Auto work queues
- Click on + New work queue template button
You will taken to the following screen, where you will be prompted to enter some basic information about he template.
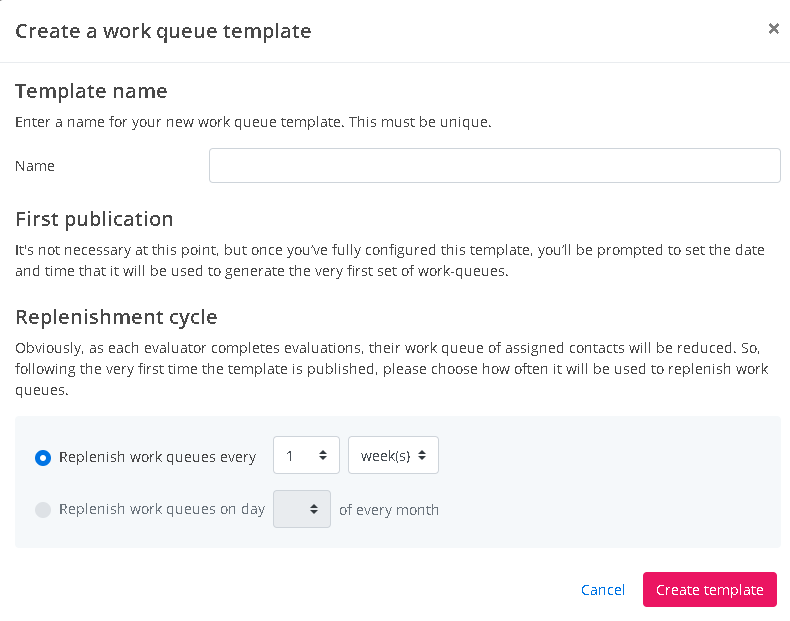
- Template name: Add a unique name for this template. Please note that, to avoid confusion, names must be unique and cannot be the same as any previously created templates (including deleted templates).
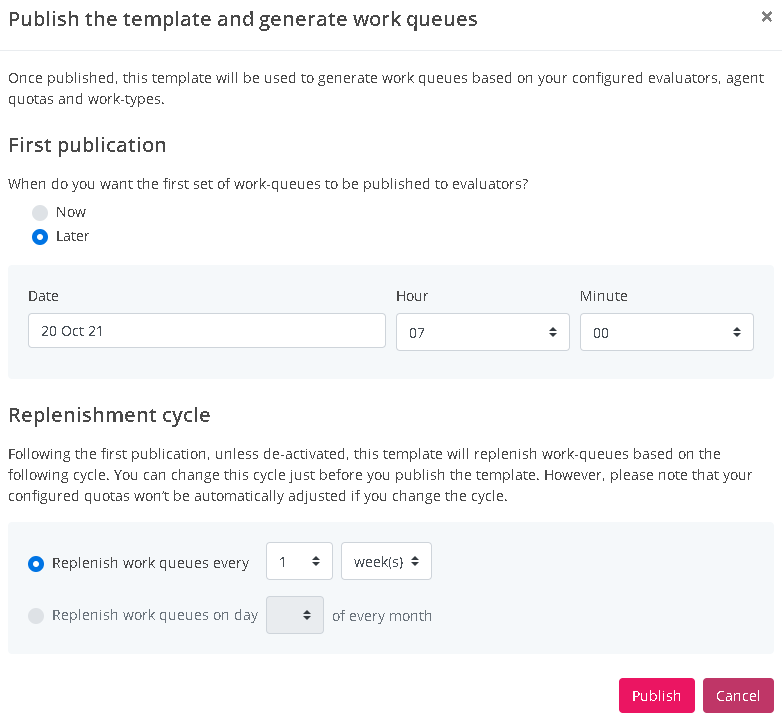
- First publication: It's not necessary at this point, but once you’ve configured all of the template details, at the end of the process, you’ll be asked to set the date and time that the template will be used to publish the very first set of work-queues.
- Replenishment cycle: After that very first publication, an active template can be configured to replenish work-queues on a daily (to run every n days), or weekly-cycle (from once a week, up to once every 52 weeks), or on a specific day (1st to the 28th) of each month.
This replenishment cycle obviously influences how you set quotas for the template, so this is why you need to decide on the cycle here at the start of the process. Returning to the example above, if you want the template to generate 4 evaluations per agent per week, and you want work-queues to be replenished once a week, then (as part of a latter step) the quota you assign to each agent would be 4. Alternatively, if you wanted to replenish work-queues on the 1st day of every month, then the quota you assign to each agent would be closer to 16 (4 per week x 4 weeks in a month).
Once you've named the template, assigned a replenishment cycle, and clicked Create template, you'll be directed to the first of 3 steps required to assign quotas to the template.
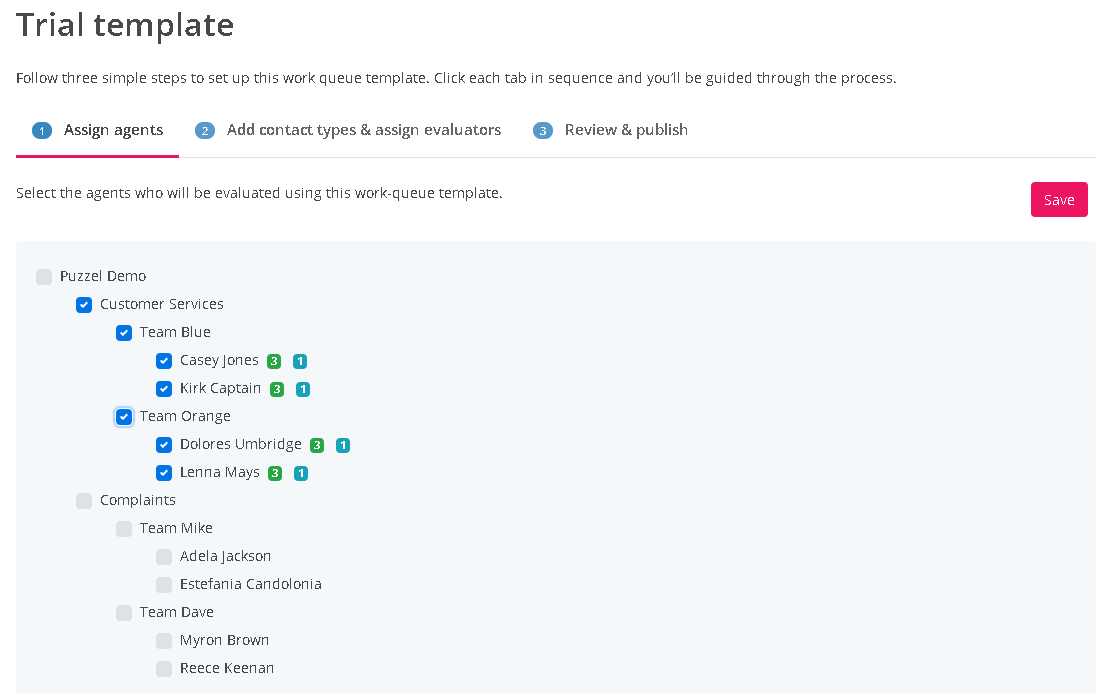
Step 1: Assign Agents
You first land on the Assign agents tab where all active agents will be listed. You simply select the agents you wish to be covered by this template by ticking the relevant names. You can tick individuals or any level of your organisational structure to auto-select all groups / teams / agents underneath.
There are a few points to reference here;
- Only active agents are visible
- As soon as any previously selected (ticked) agent is made inactive via User Admin, they are removed from the template automatically so that future work queues generated by the template will not include evaluations for agents who have left the business
- Active agents can be added to more than one template.
Once you've ticked the agents you wish to be covered by the template, press Save and move onto the next step, by clicking the second tab...
Step 2: Add contact types & assign evaluators
Click the + New contact type button to add the types of contact you wish to evaluate. You have 2 contact types to choose from.

Option 1: Imported contacts
First of all, it's worth mentioning that this option is only available if you've set up an integration and you have configured at least one active filter.
The full list of active filters is presented and you'll be prompted to choose one.

Once you've selected the filter that will be used to populate the work queue, you'll be prompted to select how you will allocate tickets that contain multiple responses.

Next, you set an evaluation quota for each agent. For example, if you configured work queues to be replenished every 1 week and you set a quota of 4 here, then each agent in your work queue will be evaluated 4 times every 1 week for this work type.
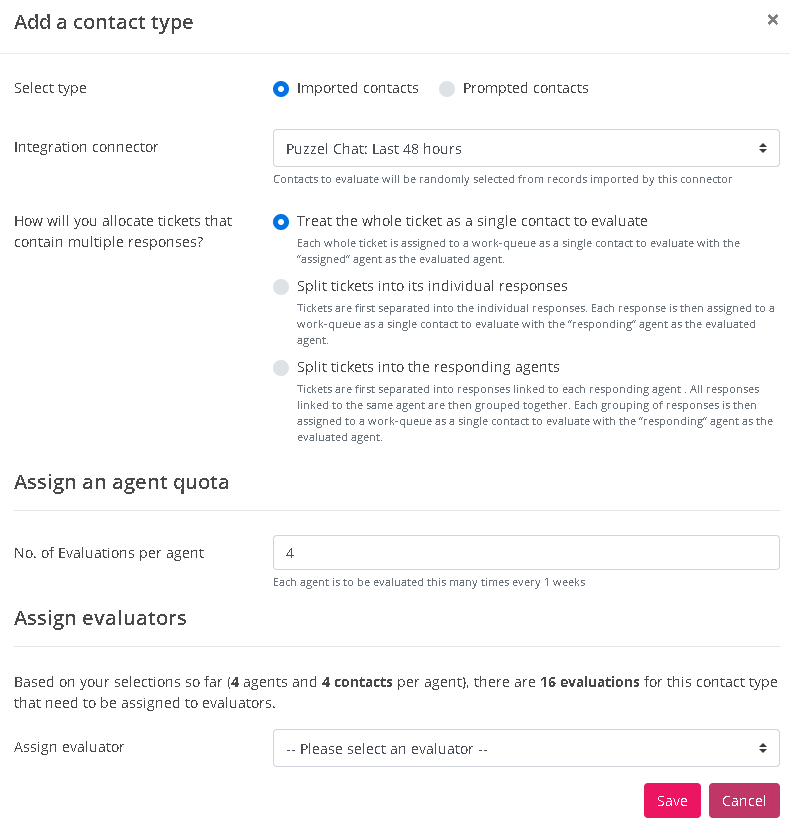
Based on the example we've used so far to illustrate the process - we assigned 4 agents in Step 1 and based on the parameters selected above, this work type is to be evaluated 4 times per agent.
As a result, there are currently 16 contacts to be evaluated. So, lastly, you now need to assign evaluators to this work-type. You do this by selecting evaluators and assigning a % share to each user.

Once all parameters have been set, the contact-type is saved and it appears in the table as shown below.

Option 2: Prompted contacts
If you don't have any integrations set up, you could add prompted contacts.
For prompted contacts, the process is almost identical to that described above. However, instead of selecting an integration, you'll be asked to add a channel and a prompt that effectively instructs the evaluator on the type of contact to evaluate.
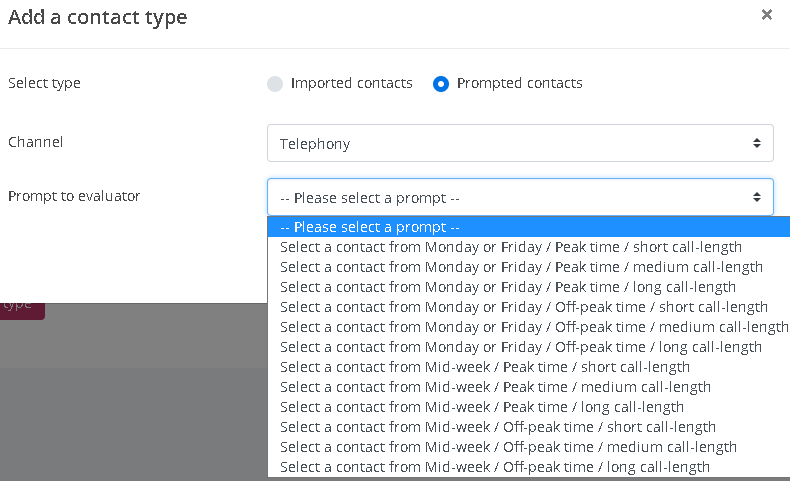
Prompts for each channel can be configured in quality settings.
You can repeat the process of adding work-types to a template as many times as you wish, building up the work queue and its quotas based on a range of different contact types.
Step 3: Review and publish the resulting work queues
Once you've added all of the contact-types and agent quotas for this template and you've allocated the resulting workload amongst your team of evaluators, the template is ready to be used to generate a work queue for each of those assigned evaluators.
Before publishing, the system summarises the template on the third tab.
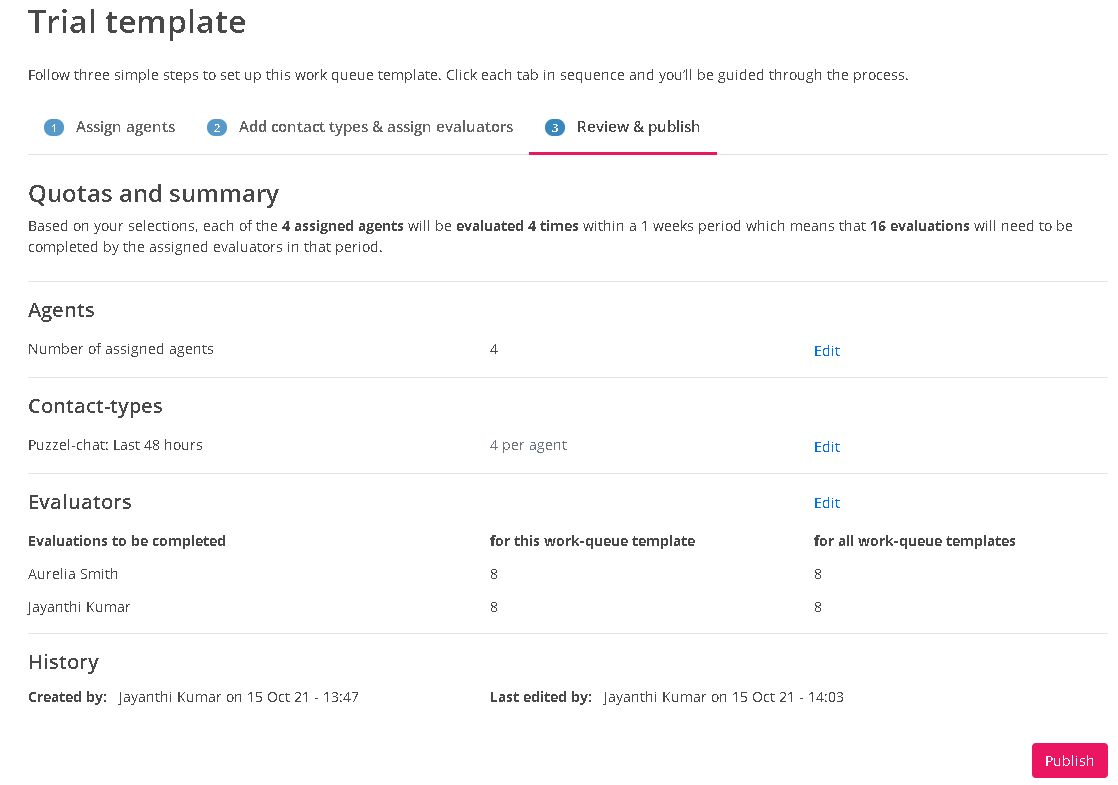
When you're ready, click the Publish button and you'll be prompted to choose the date and time that the template will be used to publish the very first set of work-queues. You'll also be prompted to re-confirm how often work-queues will be replenished.
Once published, the work queue template will automatically (and randomly) assign specific contact-types to specific agents and specific evaluators at specific times!
In the example used to describe the process, the two evaluators assigned will each have 8 evaluations allocated to them. The contacts to evaluate will be randomly selected from contacts imported via the "Puzzel Chat: Last 48 hours" connector.
Finally, unless edited or deleted beforehand, the template will automatically run again in 1 weeks time to replenish evaluators work queues with another batch of evaluations, thus ensuring that the assigned agents continue to receive a regular quota of evaluations.
The resulting work queues
The evaluations are now available for the evaluators, and when they access the Evaluate tab, they will be presented with their work-queue of randomly selected contacts to evaluate. In the event that there aren't enough imported contacts available to fill an evaluator's work-queue when the queue is first published, then messaging at the top of the table (See below) informs the evaluator as to the status of their work-queue.

Contacts are imported on a regular basis and, when any import job next runs, the resulting batch of newly imported contacts will be sampled in order to fill any gaps in the evaluator's work queue.
This process will continue until one of the following events occurs:
- the work-queue is filled
- the template runs again and the work-queue is replenished
- the work-queue template is deleted.
Replenishing work queues
After a template publishes its very first set of work queues, it will repeat the process at regular intervals (whilst it remains active) based on its assigned replenishment cycle. (E.g. once a month, once every 13 weeks, on the 1st of every month, every 3 days).
Whenever a template replenishes a work-queue, any incomplete evaluations remaining in the work-queue from a previous run are dealt with as follows:
- Any incomplete evaluations that have been assigned an actual imported contact remain in the work-queue.
- Any incomplete evaluations not yet assigned an imported contact (unfilled quota) are removed from the work queue.
- All incomplete evaluations assigned to a manual prompt remain in the work-queue.
If you do wish to delete or re-assign any or all incomplete evaluations from a previous or current run, it's a very straightforward process...
Deleting / re-assigning work queues
Users assigned the permission to Delete & re-assign contacts can do this one by one (or in bulk). Firstly, tick the box(es) adjacent to the relevant incomplete evaluations and secondly, press the button that matches the outcome you wish to achieve.

Deleting work-queue templates
Templates can be deleted at any time by clicking Delete on the row of the template you wish to delete.

When a template is deleted, the scheduled next run is cancelled and it will never again be used to generate work queues.
If a template has been used to generate work queues, as well as deleting the template, you'll be asked if you wish to remove any incomplete evaluations remaining in the work-queues generated by this template.

If you choose Yes, then any incomplete evaluations remaining in the work-queue from this template's last run are dealt with as follows:
- Any incomplete evaluations that have been assigned an actual imported contact are removed from the work queue and the contacts are returned to the imported contacts table.
- Any incomplete evaluations not yet assigned an imported contact (unfilled quota) are removed from the work queue.
- All incomplete evaluations assigned to a manual prompt are removed from the work queue.
If you choose No, then any incomplete evaluations remaining in the work-queue from this template's last run are dealt with as follows:
- Any incomplete evaluations that have been assigned an actual imported contact remain in the work queue.
- Any incomplete evaluations not yet assigned an imported contact (unfilled quota) are removed from the work queue.
- All incomplete evaluations assigned to a manual prompt remain in the work-queue.
Understanding how templates and evaluators are performing
It's possible to track the progress of a specific instance of a published work queue template by viewing the Progress report.

Clicking the Progress button reveals the following report where you can search for a specific work-queue template to understand how it is being processed.
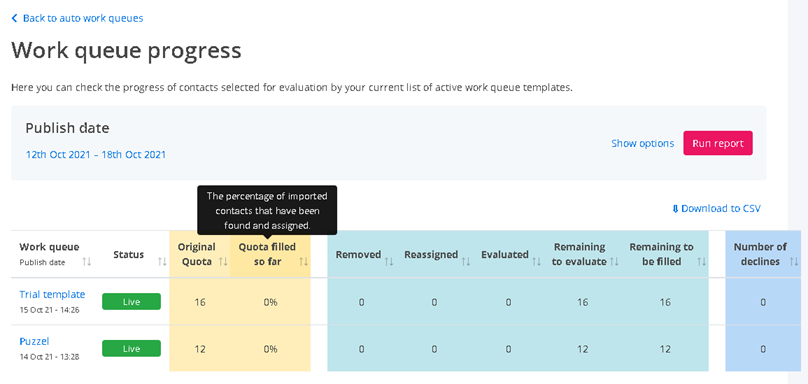
Clicking View, reveals how each of the assigned evaluators is processing their assigned work queue. While viewing the progress page, you also have the option to reduce the number of contacts awaiting an imported contact. By selecting the 'edit' option on the page, and reducing the number for each evaluator.
You can also pause a Work Queue Template to stop it from running again in the future. On the Work Queue Templates table, one of the options is "Pause".

A paused work queue won't generate new contacts. To resume it, just click on the resume button:
