Configuring Puzzel ID OIDC Clients
Using Puzzel ID OIDC client applications, you can effectively access existing services and create your own applications with secure user authentication and authorization.
Some example use-cases are:
- Adding a client to access the Puzzel ID SCIM API (provisioning server). This could used e.g., for setting up provisioning in Entra ID using the non-gallery app approach, provisioning via another third-party system, for a custom integration to the SCIM API or just for testing.
- Creating your own applications that authenticates with Puzzel ID. This could be extensions to our products or standalone applications. E.g., if you write a web application that interfaces our Contact Centre APIs you could use Puzzel ID as an IDP and call that API using the user access token retrieved.
- Creating access tokens to access Puzzel API. For example, if you are writing a server-side daemon application that needs to access some Puzzel API you could use the client credential flow to get an access token.
How you need to configure your client depends on the use-case. If you need a client for a backend daemon service using client credential flows, then you don’t need to add redirect URLs etc. But if you are creating a web application the redirect URLs are essential.
Accessing OIDC Client configuration
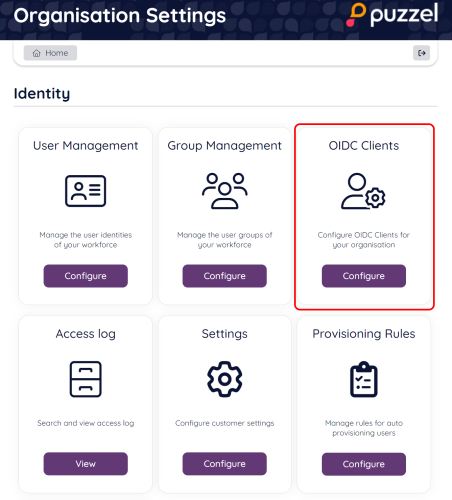
From the Organisation Settings home page, navigate to the “OIDC Clients” section using the navigation icon as highlighted below:
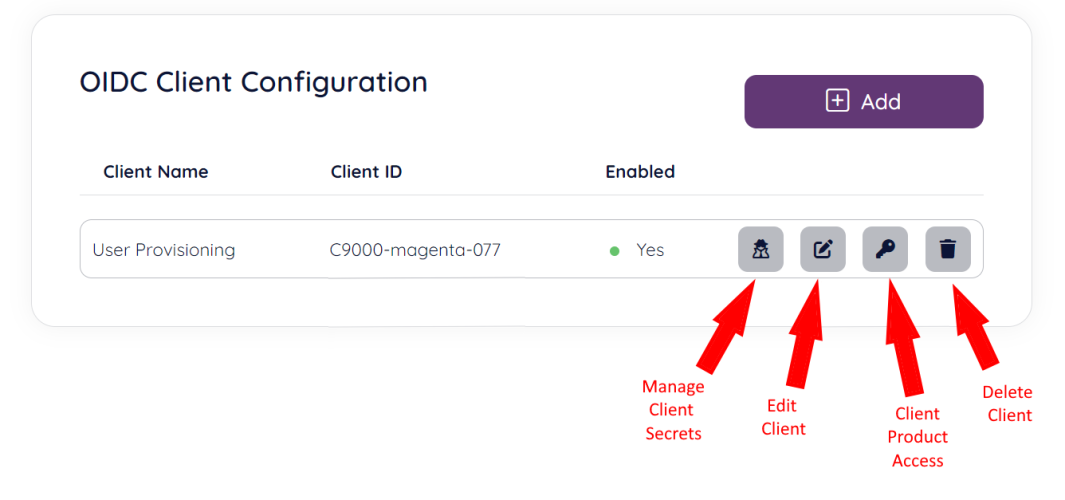
You will be taken to the “OIDC Clients” home page. Here you will find a list of existing OIDC clients, if any, and the possibility to create a new OIDC client. For existing clients you can add / manage client secrets, manage client product access, edit and delete the client.
Editing a client
To edit an existing client click the “Edit” icon on the row of the client you want to edit. You will now be able to edit all editable fields as described under the “Creating a new client” section below.
Deleting a client
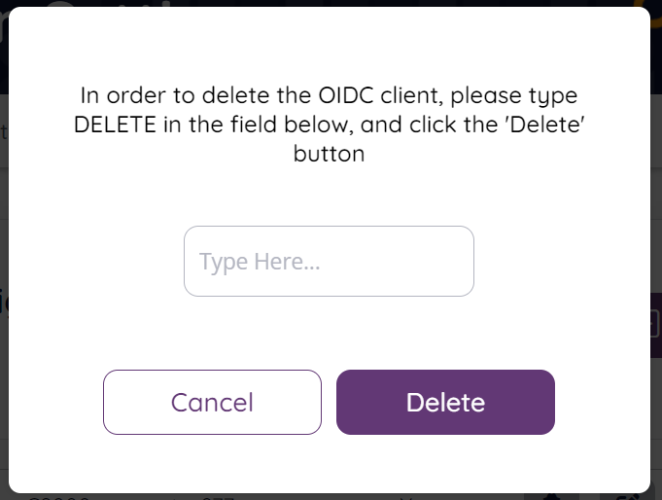
To delete an existing client, click the “Delete” icon on the row of the client you want to delete. You will now get a confirmation pop-up window where you have to type the words “DELETE” to confirm the deletion.
Creating a new client
To create a new client click the “Add” button from the “OIDC Clients” section main page:

On the next page you will be asked to fill in some general information about your new client:
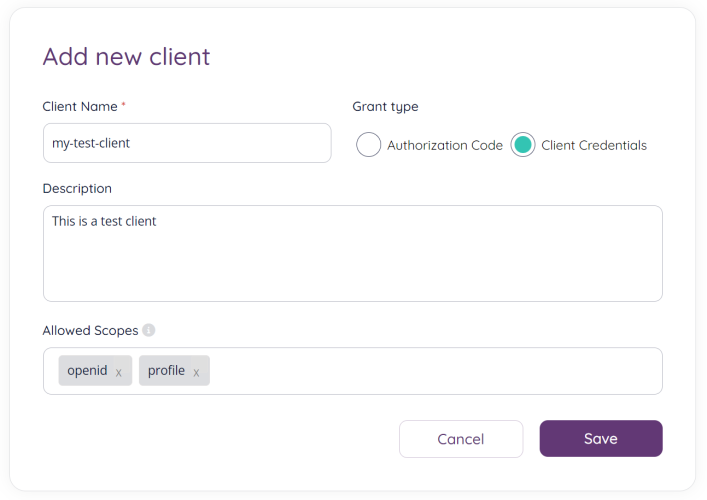
- Client name: A name for your client (note: this is not the client id, that will be generated when you click “Save” on this screen).
- Grant type: The OAuth Grant Type to use for this application.
- Authorization Code: if you’re buiding a web application or any kind of application with a UI, then this is probably the grant type you want.
- Client Credentials: typically used for backend services (daemon services).
- Description: Add a description for your client
- Allowed Scopes: Used to specify the level of access and permissions. The general scopes are:
- profile: Returns claims that represent basic profile information.
- openid: Returns the sub claim, which uniquely identifies the user. In an ID Token, iss, aud, exp, iat, and at_hash claims will also be present.
- email: Returns the email claim, which contains the user's email address, and email_verified, which is a boolean indicating whether the email address was verified by the user
- roles: Returns the role claim is a list of role names assigned to the user. Also adds the roles claim which is one or more (array) JSON objects with role identifier and name.
- groups: Return the groups claim which is one or more (array) JSON objects with group id, name and a reference ($ref) to Provisioning Server.
- masterdata: Puzzel Masterdata related claims
There are more api / application specific scopes available, but these will be documented as part of the provisioning of these services / features.
Click “Save” to proceed and you should be taken to the “home” page of your newly created application where additional information can be added:
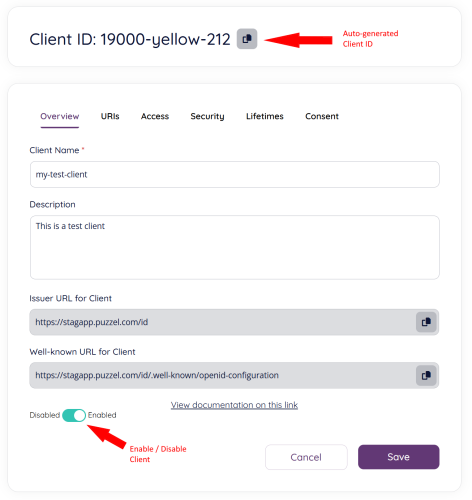
- Client ID: The client ID is an auto-generated value which is a unique identifer for your client. Click the copy button to copy the client id to your clipboard.
- There are six subsections / tabs for client configuration:
- Overview: The “home” / “start” tab for client configuration
- Client name: Name as initially entered when creating the client
- Description: Description as initially entered when creating the client
- Issuer URL for Client: The URI to issuer that the client asserts as its issuer identifier
- Well-known URL for Client: URL to OpenID metadata
- Disabled / Enabled: Disables or enables the client.
- URIs
This section is relevant if you are building / configuring a web-based application.- Redirect URIs: Specifies the allowed URIs to return tokens or authorization codes to
- Post logout Redirect URIs: Specifies allowed URIs to redirect to after logout.
- Front Channel Logout URI: Specifies logout URI at client for HTTP based front-channel logout.
- Require front channel logout session: Specifies if the user’s session id should be sent to the FrontChannelLogoutUri
- Back Channel Logout URI: Specifies logout URI at client for HTTP based back-channel logout.
- Require back channel logout session: Specifies if the user’s session id should be sent in the request to the BackChannelLogoutUri.
- Access
- Allowed scopes: Specify the allowed resources (see above)
- Allow offline access: Specifies whether this client can request refresh tokens (be requesting the offline_access scope)
- Security
- Allowed CORS Origins: If specified, will be used by the default CORS policy service implementations (In-Memory and EF) to build a CORS policy for JavaScript clients.
- Grant type: The grant types the client is allowed to use, either “Authorization code” (typically for web-based application) or “Client Credentials” (typically for background / daemon services)
- Always include user claims in ID token: When requesting both an id token and access token, should the user claims always be added to the id token instead of requiring the client to use the userinfo endpoint
- Require Client Secret: Specifies whether this client needs a secret to request tokens from the token endpoint.
- Lifetimes
- Identity Token Lifetime: Lifetime to identity token in seconds
- Access Token Lifetime: Lifetime of access token in seconds
- Authorization Code Lifetime: Lifetime of authorization code in seconds
Absolute Refresh Token Lifetime: Maximum lifetime of a refresh token in seconds.
Setting this to 0 has the following effect:
- When “Enable Sliding Refresh Token Lifetime” is set to “Yes”, the behavior is the same as when no refresh tokens are used.
- When “Enable Sliding Refresh Token Lifetime” is set to “No”, refresh tokens only expire after the SlidingRefreshTokenLifetime has passed.
- Sliding Refresh Token Lifetime: Sliding lifetime of a refresh token in seconds.
- Enable Sliding Refresh Token Lifetime: If set to “Yes”, when refreshing the token, the lifetime of the refresh token will be renewed (by the amount specified in SlidingRefreshTokenLifetime). The lifetime will not exceed the value set in “Absolute Refresh Token Lifetime”. If set to “No”, the refresh token will expire on a fixed point in time (specified by the “Absolute Refresh Token Lifetime”).
- Consent
- Documentation URL: URI to client documentation
- Logo URL: URI to client logo.
- Consent Lifetime: Lifetime of a user consent in seconds.
- Require consent: Specifies whether a consent screen is required
- Allow remember consent: Specifies whether user can choose to store consent decisions
Adding a Client Secret
To add a secret to your client, click the “Manage Client Secrets” icon as shown below:
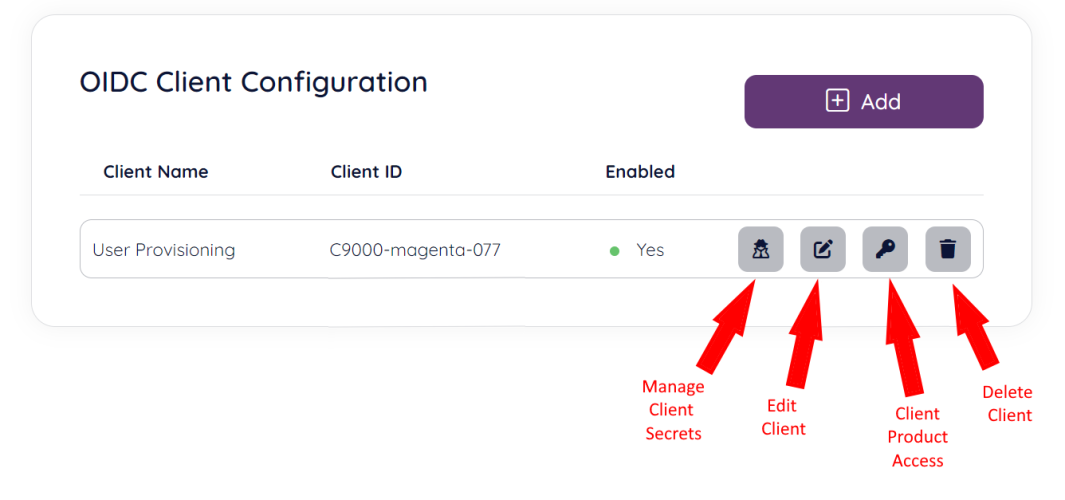
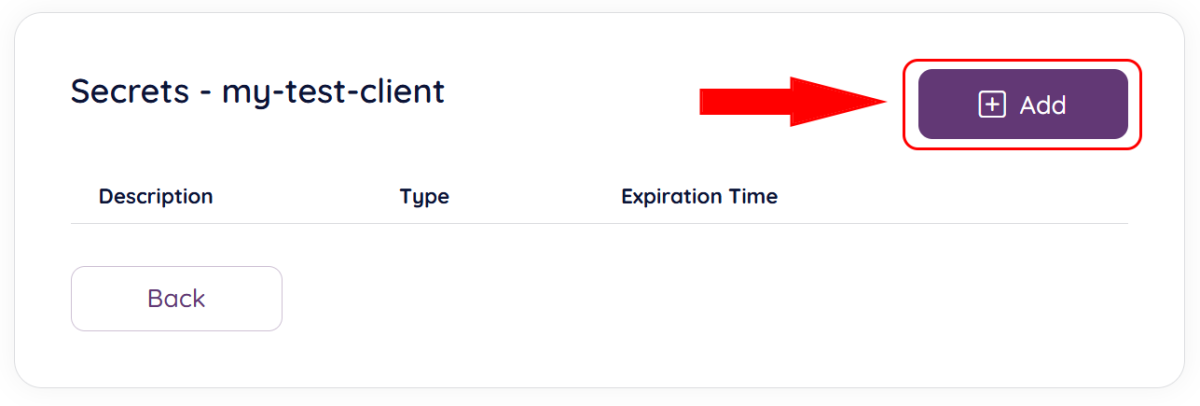
You will be taken to the secret management screen, click “Add” to add a new secret:
Creating a Shared Secret
Shared secrets is by far the most common technique for authenticating clients.
From a security point of view they have some shortcomings
- the shared secrets must be transmitted over the network during authentication
- they should not be persisted in clear text to reduce the risk of leaking them
- they should have high entropy to avoid brute-force attacks
When selecting “Shared secret” from the “Add” button”, a new secret will be generated and you will be able add a description for your secret and also an expiration time. The expiration time can be edited at a later stage.
The actual secret value will only be shown at the “Add new secret" page below. So remember to copy the value before saving the secret.
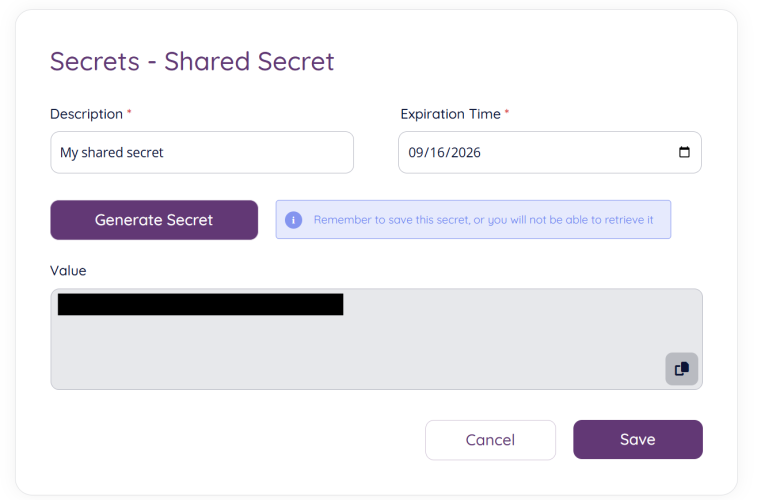
Copy the secret and store it in a safe place, then press “Save” to store and activate the secret for your client.
Creating a Private Key JWT
The OpenID Connect specification recommends a client authentication method based on asymmetric keys. With this approach, instead of transmitting the shared secret over the network, the client creates a JWT and signs it with its private key.
The technique is described here and is based on the OAuth JWT assertion specification (RFC 7523).
When selecting “Private Key JWT” from the “Add” button you will be taken to the following screen:
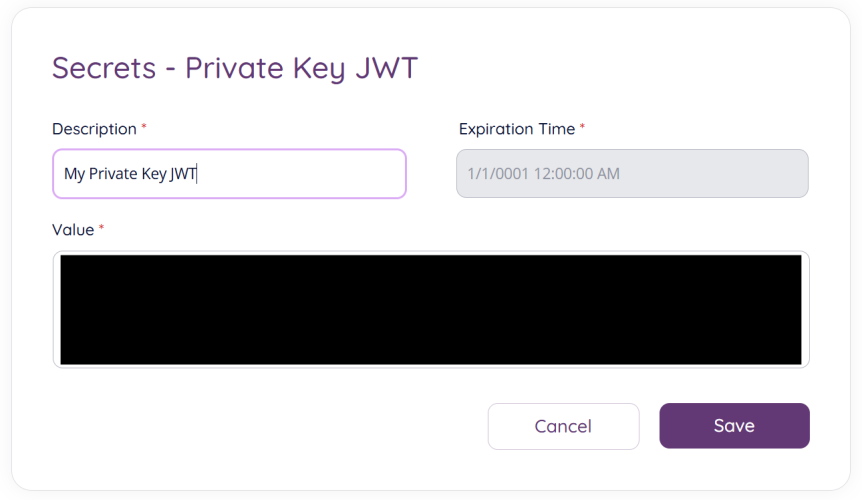
You will need to add a decription for your new secret. and add either a base64 encoded X.509 certificate or a JSON Web Key formatted RSA, EC or symmetric key in the “Value” field. The expiration time will be extracted from the provided certificate or key.
Editing and deleting an existing secret
From the client secret start page you will be able to perform two operations on existing secrets as is shown below:
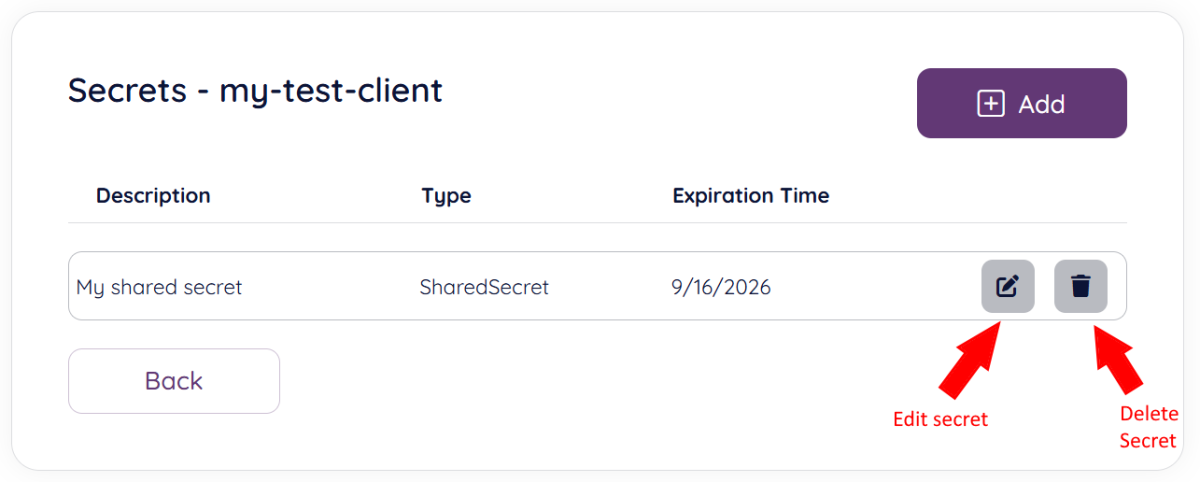
- Edit secret: The only editable field is the description and expiration time. The secret value cannot be edited.
- Delete secret: This will bring up a confirmation popup, similar to the one for deleting clients, where word “DELETE” needs to be entered as confirmation of the deletion.
Assigning product access
Some integrations require that one or more product specific users are assigned to the client. This section will explain how this generally is done, but note that you might need to refer to use-case specific documentation for additional details.
To assign product access to a client, choose the “key” symbol in the client list:
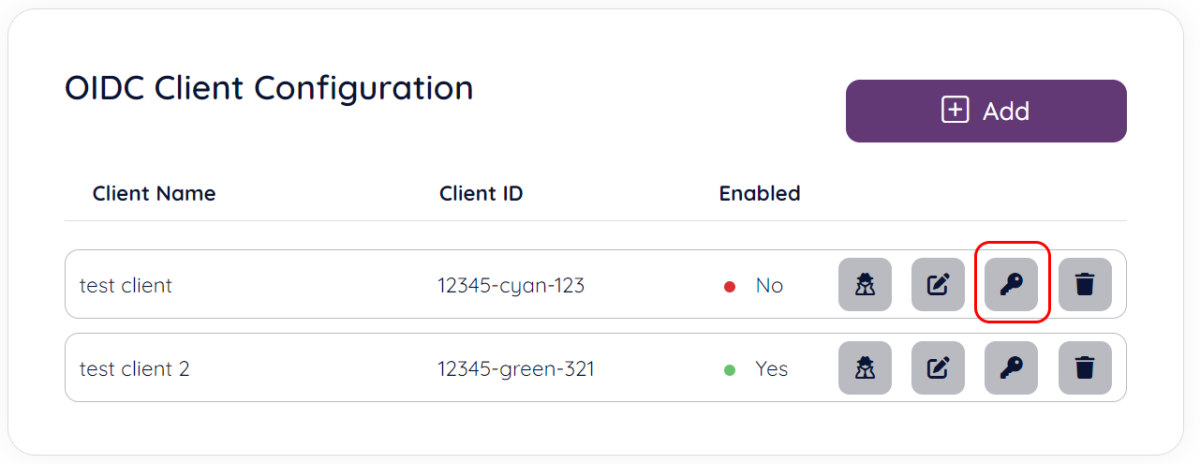
Next you are taken to the client product access screen, if this is the first time you are configuring client product access you will be taken to a page where your only options are to add new product access or cancel the operation (back button).

If you have set up client product access earlier, a list of currently associated product specific users will be shown.
Click the “Add” button to associate a product specific user to the client. A popup box will appear:
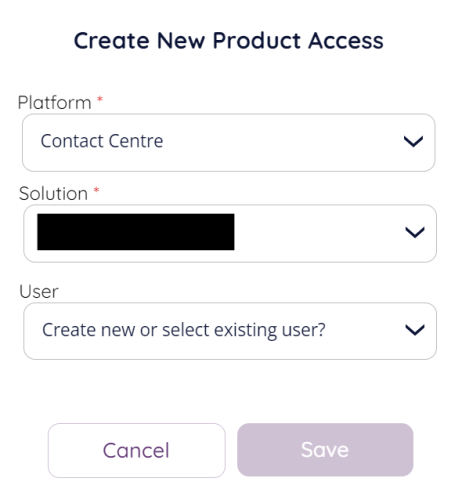
Platform currently has two options (more might be added later depending on requirements):
Contact Centre (PCC)
Workforce Management (WFM)
After choosing the platform the solution list will be populated with the solution(s) your account have for this product (platform), this might be none. If you have multiple solutions for a product / platform the choose the one containing the platform user you want to link up / create.
If you chose the WFM platform you will now see a list of existing users to link to the client, chose the user you want to associate with the client and click “Save” to store.
If you chose the PCC platform you have two options after selecting the solution, as can be seen in the above screenshot, create new or select existing user. In addition to selecting existing user you can also create a new user to associate with the client.
Creating a new contact centre user to associate with the OIDC client
When selecting to create a new user to associate with the client, you first need to select the PCC user group to create a the user in, this is mandatory in PCC. If you have no usergroups defined you need to do this in PCC admin first.
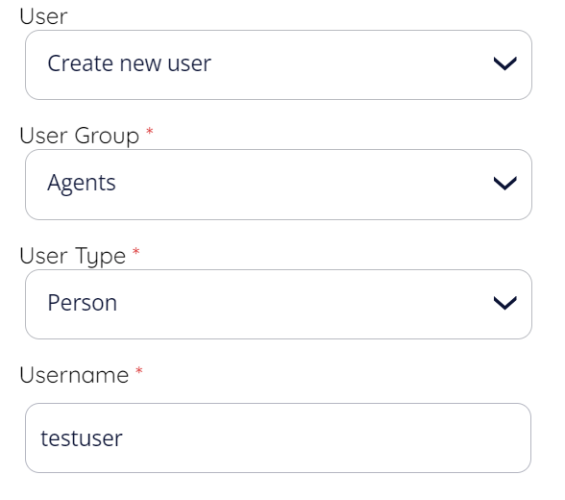
You also need to select the user type, the following options are available:
Person (a regular human user)
API (user created for API authentication)
Wallboard (user created to access wallboards)
Chatbot (user created for chatbot agents)
For more information about usergroups and user types in the contact centre, please consult the PCC user guide.
Finally you need to add the username for the new user, this needs to be unique within the PCC solution.
