
Configuration
Most configuration can be done from the configuration tool, but not all. Please note that the Exchange connector has to be restarted before any changes will take effect. For best results with testing connectivity to the server and individual mailboxes and public folders, run the configuration tool in context of the Exchange connector service account.
Required rights and privileges for the service account
The service account should be a separate account that only runs the Exchange connector. This account must be mail-enabled in order to be delegated the “full access” rights it needs on the monitored mailboxes. Full access can be substituted with reviewer rights on the mailbox root and inbox but then those rights must be set in powershell.
For public folders the service account requires read access to every mail enabled public folder it monitors. The service account must also be able to run as a service.
Files
The connector uses data from several files. Most of these can be configured with the Exchange connector configuration tool. The files will not appear until after the first time the configuration tool have been started.
FileConfig.xml

The FileConfig.xml file specifies where the rest of the configuration files are located and is the only file that can’t be edited through the configuration tool. By default all files are installed with the program in the program files folder. If it is necessary to put the files somewhere else then edit FileConfig.xml and insert the new paths. The FileConfig itself must be in the same folder as the program.
Both the connector and the configuration tool needs read access to this file.
Config.xml
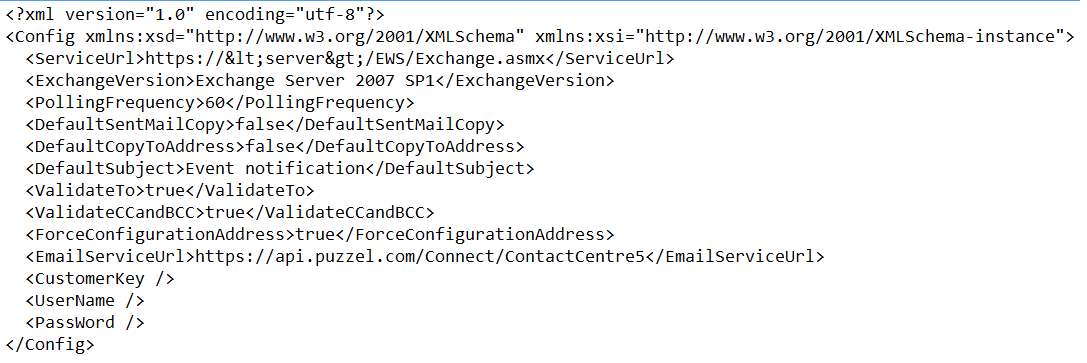
This is the file where the global configuration and default settings for mailboxes and public folders are stored. It can be edited from the configuration tab in the configuration tool.
Both the connector and the configuration tool needs read access to this file. The configuration tool also needs write access.
Mailboxes.xml
This file contains settings for individual mailboxes and can be edited from the Mailbox tab in the configuration tool.
Both the connector and the configuration tool needs read access to this file. The configuration tool also needs write access.
Publicfolders.xml
This file contains settings for individual public folders and can be edited from the Public Folder tab in the configuration tool.
Both the connector and the configuration tool needs read access to this file. The configuration tool also needs write access.
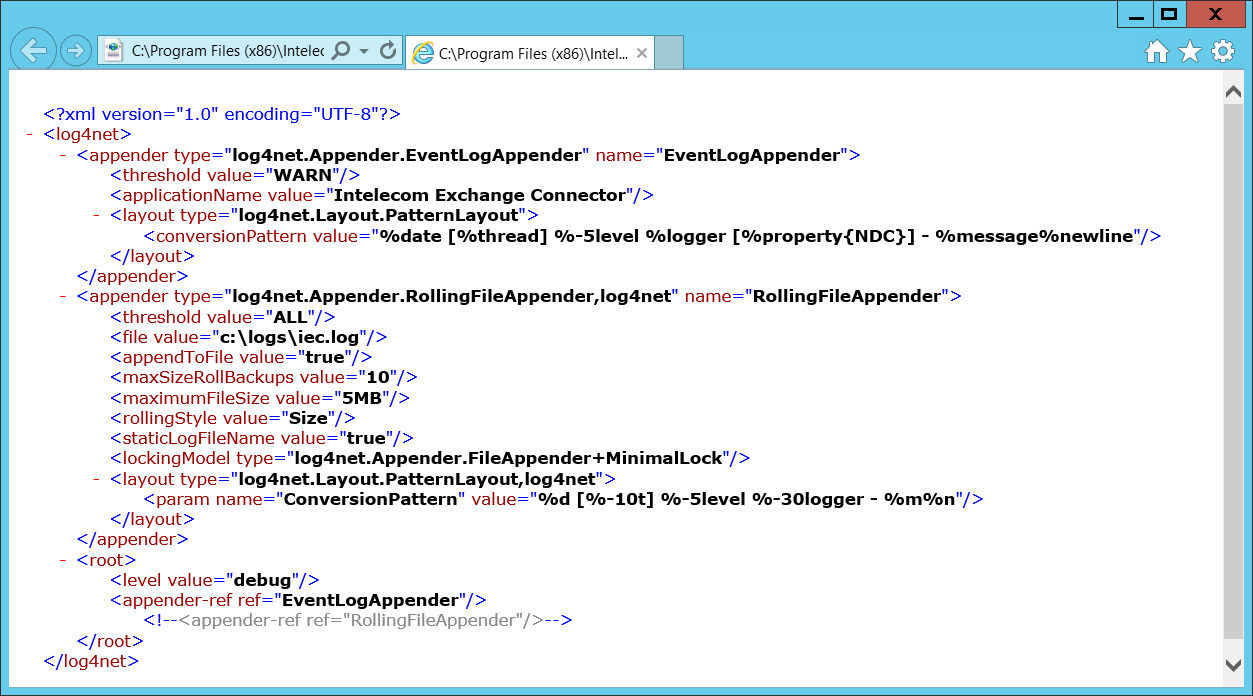
Log.xml
Log settings can be changed by editing the Log.xml file. The Exchange Connector uses Log4Net. For instructions about adding new appenders, please see the documentation for Log4Net. By default settings for the eventlog and rolling file appenders are already in the file. The RollingFile appender is turned off, but can be turned on by removing the comments in the appender reference and changing the file value to the wanted path for the logs.
The subscriptions folder
This folder will contain xml files that contain the state of the subscription for each monitored folder, one file per subscription. This is to ensure that connector can continue from where it left off if the connector service is stopped for any reason. The files are named after the email address of the folder and can be safely deleted if the connector has been stopped and the old data is not wanted. If the connector have been stopped for a long time this can be a substantial amount of email. The state of each subscription is retained for up to 30 days.
The connector needs read and write access to this folder. The configuration tool doesn’t use this folder.
Exchange connector configuration tool
Most changes to the connector can be done from the configuration tool. As noted before, changes will not take effect until the connector service has been stopped and then started again.
The configuration tab

Exchange webservices url: This is the address to the web services the Intelecom Exchange Service will be using. Typically this is the Exchange.asmx service in the EWS virtual folder on your Client Access Server.
- Exchange server version: Choose the option that is correct for your Exchange installation.
- Polling frequency: How often the service will check for updates on the folders it monitors.
- Customer key: The customerkey as configured in the admin portal.
- Username: The username as configured in the admin portal.
- Password: The password of the user above. In general this, the username and the customerkey will all be provided by Puzzel support.
- Puzzel webservice uri: This is the root uri to the Puzzel REST webservices. By default https://api.puzzel.com/Connect/ContactCentre5.
- Default item access path: This is the default command that is sent to a client when an email arrives through the queue. Please see the section “access path variables” to see which variables can be sent through this command.
Use the save button to save the current configuration.
The mailboxes tab
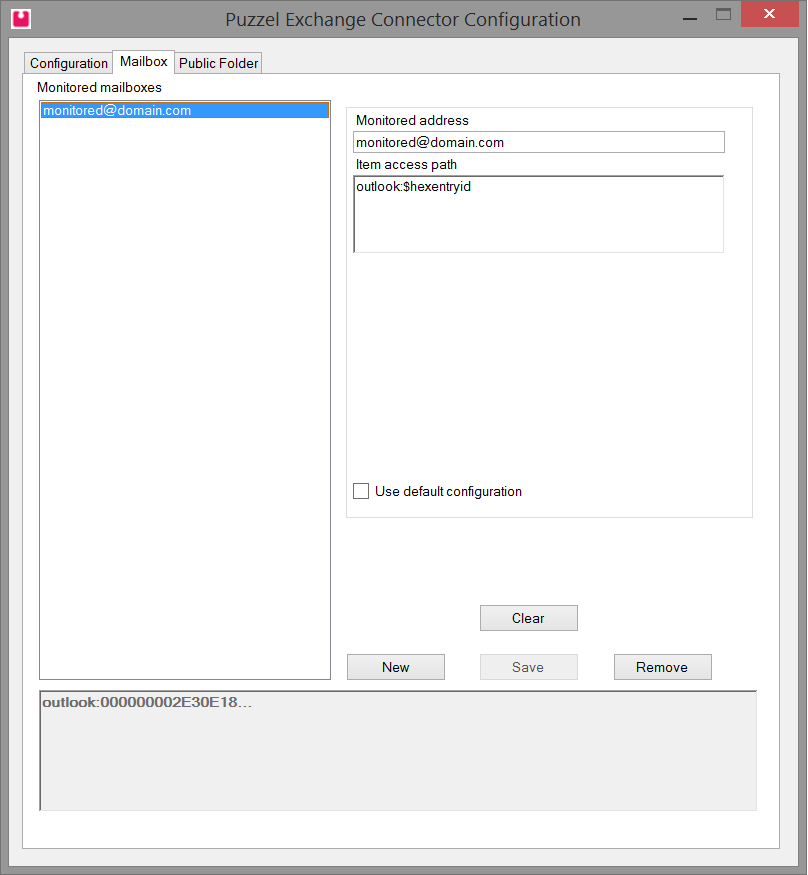
Select a mailbox from the monitored mailbox list to look at the configuration for that mailbox or to change it. To set up a new mailbox subscription, use the “new” button. To clear all information for the selected or new mailbox, use the “clear button. To remove a mailbox from the list, click “remove”.
Monitored address: This is the smtp address of the mailbox you are monitoring. By pushing the “Test” button the program will check if that address is found within the Mailbox store.
Item access path: The client that will be sent to clients for mail from this mailbox.
Use default configuration: If this checkbox is checked the mailbox will use the default configuration as set on the configuration tab. As long as it is checked it is only possible to change the monitored address for this mailbox.
The public folders tab
There is only one real difference between the mailbox tab and the public folder tab: Public folders have a public folder path that identifies them. The rest is still summed up below for completeness.
Select a public folder from the monitored public folders list to look at the configuration for that public folder or to change it. To set up a new public folder subscription, use the “new” button. To clear all information for the selected or new public folder, use the “clear button. To remove a public folder from the list, click “remove”.
Monitored address: This is the smtp address of the public folder you are monitoring.
Public folder path: The path to the public folder you are monitoring, this includes the name of the public folder itself. As an example the path would be Folder1\Folder2 if you were monitoring the subfolder Folder2 that is in Folder1. By pushing the “Test” button the program will check if that address is found within the public folder store.
Item access path: The client that will be sent to clients for mail from this public folder.
Use default configuration: If this checkbox is checked the mailbox will use the default configuration as set on the configuration tab. As long as it is checked it is only possible to change the monitored address and public folder path for this public folder.
Item access path
The item access path must be configured for the mailboxes and public folders that are subscribed to. How this path looks depends on which client that is used to open the messages.
Access path variables
There are several variables that can be used as part of the access path. These will be replaced with the actual values from the mail item.
- $itemid – The unique ID of the message in the information store. Used by Exchange Web Services.
- $folderid – The unique ID of the folder the message is located in. Used by Exchange Web Services-
- $sender – The smtp sender address.
- $recipient – The smtp recipient address of the monitored mailbox or public folder.
- $subject – The message subject.
- $recipientlist – The smtp address of all recipients of the message. This will be sent as a semicolon separated list.
- $owaid – The unique ID of an item as used by Outlook Web Access and Outlook Web App.
- $entryid – This is the MAPI identifier of an item. This feature requires service pack 1.
- $storeid – The identifier of an item in the Exchange store. This feature requires service pack 1.
- $hexentryid – A hexadecimal-encoded representation of the entry id. Can be used with the outlook: command to open a mail item. This feature requires service pack 1.
Outlook and Outlook Web App
When the agent receives notification of a new mail the item must be opened in a mail client. This section contains information about how mail items can be opened in Outlook 2007 and Outlook Web Access 2007. The account that opens the mail must have the correct privileges to do so.
Outlook Web App
It is possible to open an item in Outlook Web App with the Url of the server and the $owaid variable.
Example:
https://exchserver/owa/?ae=Item&a=Open&t=IPM.Note&Id=$owaid
For Outlook Web Access 2007 and Outlook Web App 2010 the address of the mailbox to be opened must also be included unless it is the users own. The item access path for each mailbox must be configured separately for this to work.
Example:
https://exchserver/owa/username@domain.com/?ae=item&a=Open&t=IPM.Note&Id=$owaid
Exchange Server 2016 CU23
For Exchange Server 2016 CU23 it's required to change the URL to enable the email to be opened in the Outlook Web App. This is due to Exchange Server 2016 CU23 opening emails based on $ItemID instead.
Example URLs:
To switch to a specific email inbox use this URL template: https://{exchserver}/owa/{email@company.com}/?viewmodel=ReadMessageItem&ItemID=$itemid where you need to replace {exchserver} and {email@company.com} with the correct values for your setup.
To maintain the personal email use this URL template: https://{exchserver}/owa/?viewmodel=ReadMessageItem&ItemID=$itemid where you need to replace {exchserver} with the correct values for your setup.
Outlook
For outlook it is possible to use the outlook: command and the $hexentryid variable.
Example:
Outlook: $hexentryid
For the outlook: command to work the client computer also needs to have its registry updated with the following settings. Office version must be the same as the one installed on the system. The user must also have opened the other other users folder at least once in Outlook.
Windows Registry Editor Version 5.00
[HKEY_CLASSES_ROOT\outlook]

“URL Protocol”=”"

@=”URL:Outlook Folders”

[HKEY_CLASSES_ROOT\outlook\DefaultIcon]

@=”C:\\Program Files\\Microsoft Office\\Office12\\OUTLOOK.EXE,-9403″

[HKEY_CLASSES_ROOT\outlook\shell]

@=”open”

[HKEY_CLASSES_ROOT\outlook\shell\open]

@=”"

[HKEY_CLASSES_ROOT\outlook\shell\open\command]

@=”\”C:\\Program Files\\Microsoft Office\\Office12\\OUTLOOK.EXE\” /select \”%1\”"