Performance KPI configuration
How to setup KPI and Performance Goals
Creating KPI config is the foundation of being able to track and visualise performance. Here you will set the constraints of what you want to measure, who you want to measure and for when this is applicable, i.e. the period for starting and ending the measurements if applicable.
Adding a KPI
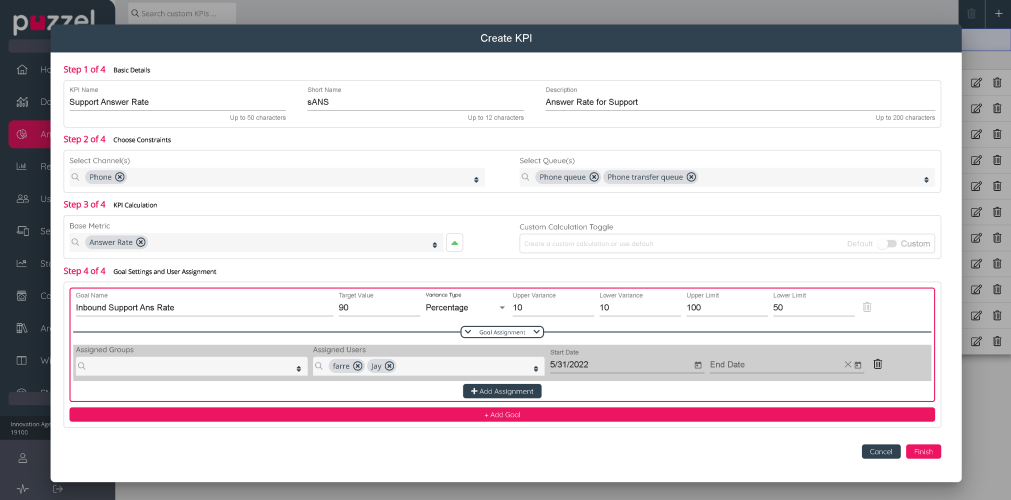
Begin by navigating to the 'Performance KPI' page and click on the + icon on the top right corner to open the dialogue for a new KPI.
There are 4 simple steps to help you setup the KPI.
Step 1: Basic Details
KPI Name: Give your KPI a name that will help in identifying which measure it entails and teams it applies to so that its easier to manage later.
Short Name: This is the name that will appear on the KPI results view and the columns in lists. Using abbreviations is recommended.
Description: Here you can elaborate on what this KPI is referring to or periods that this KPI will be used. i.e. 'Christmas Answer Rate for Support Team'
Step 2: Choose constraints
Select Channel(s): This is a filter to help you choose the relevant queues that are applicable for your intended user/user groups.
Select Queue(s): Based on the channel filter you are presented with a list of relevant queues that you can select for your KPI.
Step 3: KPI Calculation
Base Metric: A set of standard metrics is made available here for you to set your KPI against. Current metrics include:
- Total Request Volume: This is the Sum of RequestsHandled, and comprises of the total number of answered and or accepted requests in Puzzel.
- Daily Average Request Volume: Average of daily sum of RequestsHandled
- Average Handling Time: Sum of (RequestsHandled x (TotalSpeakTimeSec + TotalWrapUpTimeSec)) / Sum of RequestsHandled shown as seconds
- Answer Rate: Sum of (RequestsHandled / Sum of RequestsOffered) shown as %
- Customer Satisfaction - legacy SMS/Chat: Average of (Score / MaxScore) shown as %
- Average On Hold Time: Average of (Total time the callers were put on hold / Total Answered Calls) shown as seconds
- Average Speak Time: Average of (Total Speak Time for Calls, Emails, Chats / Total Answered Calls, Emails, Chats) shown as seconds
- More Base Metrics will be published in upcoming releases
- Customer Insight Surveys: Applicable if you have Customer Insight product enabled in your solution.
- All active surveys are listed by their 'name' in the base metric drop-down list
- The results displayed are either a calculated score value or percentage based on the type of survey
Value Preference Icon: Depending on your selected Base Metric, an Up or Down arrow is displayed to denote if a higher or lower value is preferred as a good outcome based on the trend when comparing current actual value and the previous actual value, i.e. is having a higher value a desirable trend or not.
Custom Calculation Toggle: This feature is currently disabled. Future release will allow custom calculation via selecting custom columns for the calculation using a visual editor.
Step 4: Goal Settings and User Assignments
Adding Goals
Goal name: You can add multiple goals for a KPI, for example new starters may have one goal while the standard goal may be different for others. Add a name that is suitable for which users or groups being measured.
Target value: This is your expected performance target.
Variance Type: This can be a percentage or a number and is the deviation that will be used for acceptable outcome for the desired target.
Upper Variance: Amount above the target value that is still within the acceptable range for a good score.
Lower Variance: Amount below the target value that is still within the acceptable range for a good outcome.
Upper Limit: Maximum possible value beyond which the score is considered a bad outcome.
Lower Limit: Minimum possible value below which the score is considered a bad outcome.
The range diagram below explains the logic used for the visualisation of the actual scores.
Goals Assignments
Assigned Groups: Select the user groups to assign this goal (users belonging to the selected group(s) will be automatically assigned)
Assigned Users: Select the individual user(s) to assign this goal (applicable if you only want to target specific employees in any group)
Start Date: Date from which this goal should apply to the selected users or user groups, this is also known as the effective date
End Date: Date at which this goal will no longer apply to the selected users or user groups. This is optional and if not defined the goal will remain assigned indefinitely.
Click the 'Finish' button to save the KPI configuration.


