Step by step: Dialogue with context.
Please note, this documentation is referring to functionality for which an End of Life has been announced. The announcement can be found here, and the new product documentation is available here.
In this section we will cover how to setup a more advanced intent step by step. We will create an intent that can be used with several different products. We will do the following steps.
- Create intents
- Create entities
- Create entity switch
- Create context switch
- Connecting your responses
- Testing the buikd
Using and understanding this method will let you build intents that can respond to different context and to keep this context throughout a customer journey.
Creating the intents.
This will give you an intent with where the end users intention would be to get information about “something”.

Creating entities
We now have working intent. The end user can now ask for information. But we also need to define what product or process we would like to be able to respond to.
In this example we will define a couple of vehicles as entities and try and see how the bot responds.
To do this, follow these steps.


7. Test your result in “test intents”
Now we can see that the bot extracts the product that we specified in the training data.
![]()

Create responses
Now we need to create our responses. The bot will need a response for every product that we have defined. Unless the information is the exact same for every product. Which is not the case in our example.
So now we will create the following workflows.
To make it easy for us. Create a workflow for each product using a “conversation message” like this.

Input “This is the boat response”, “This is the cars response” and so on..
The NeedInformation – Default, is special
The Default flow is created as a sort of fallback flow. If the bot picks up the intent, but does not pick up an entity. We will trigger the default flow.
Create the default flow like this.

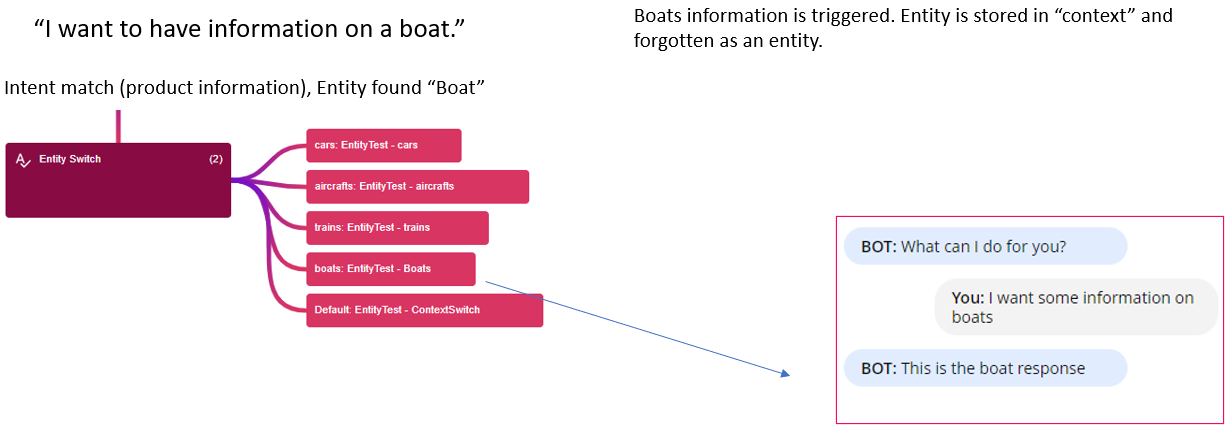
Conversation message saying: “You wanted information on a product. I didn’t get which product” Then buttons to give suggestions on products. Create the entity switchAn intent can only hold one response. However, this respond can be a switch to branch out to specific responses depending on what entity the bot picked up. So to make the bot respond depending on the product, we need to evaluate the product in an entity switch in the intent response. As soon as an entity is extracted from the NLU. This entity will be stored in the bots memory. We can now use this to switch responses in the intent response. 1.Go to intents in the main menu. 2.Select the Need information intent 3.Go to the response tab 4.Add an “Entity Switch” as action. 5.As Default, set your NeedInformation – Default 6.Add Checks to check if the bot has picked up an entity. Add one check for each defined entity. 7.For each check, add the corresponding workflow. |  |
How to keep context in the dialogue
As you have read in the section “The concept of context”, The variable “context” is the default variable where our latest context is stored. When the entity passes through an entity switch, that entity is first evaluated in the switch, then it’s forgotten as an entity and stored as “context”.
This means that “context” is what the bot is remembering from our last query.
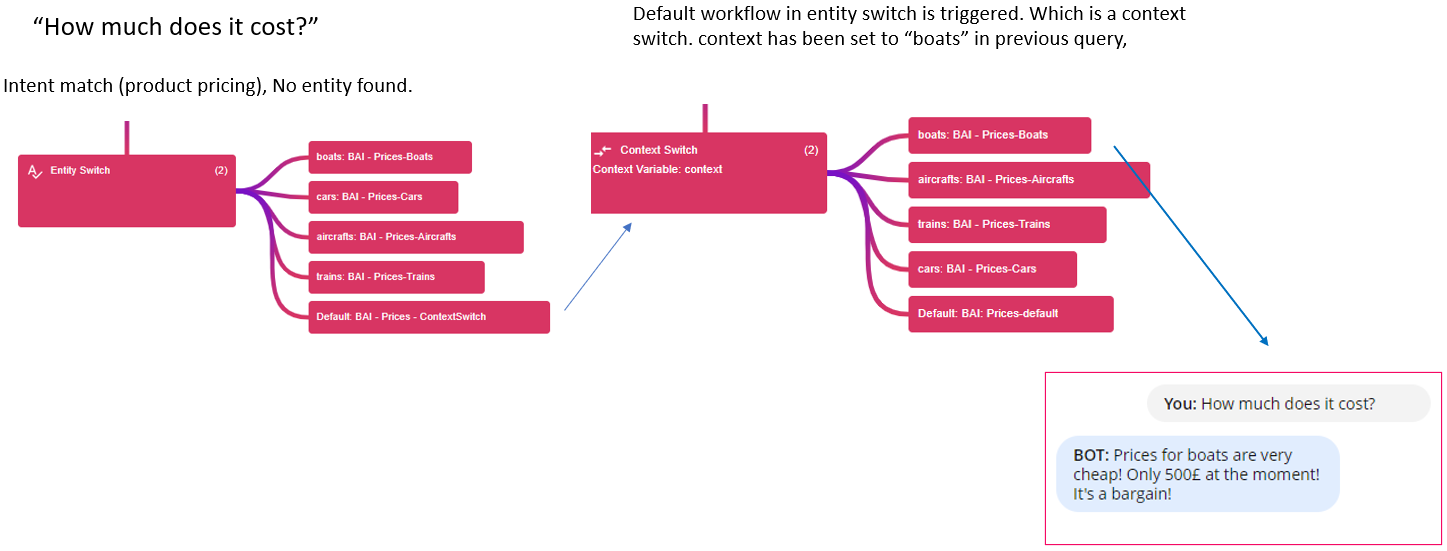
So, to be able to be more generic in how we talk to the chatbot, we can now create a “contextswitch” as a workflow.

This Context Switch will make the bot look for a previous entity, now called “context”.
If context is boats, we will trigger boats. If we do not have any context, we will trigger default. Just like the entiy switch.
When we have created the context switch. We will replace the default workflow ni out Entity switch. In this way we will first evaluate if we have an entity. If not, we will evaluate if we have a previous entity in context. If not, we will trigger the default flow.

By repeating these steps, we could now build a new intent where we ask about prices.