Outbound Integrations
Puzzel Ticketing's Outbound Integrations or Webhooks are an excellent and powerful way of communicating with a third party web application. When an event occurs in Puzzel Ticketing, it triggers an action for a predefined message to be sent out to the Webhook URL.
For example: When the priority of a ticket changes, we can send out a generic or customised message to the registered Webhook URL.
This is essentially done in four steps:
- Add an authentication method
- Register a Webhook URL
- Define the Schemas or the message to be sent when the event occurs
- Create a Event rule and define the event and tag the Webhook URL and message to be sent when the event occurs.
Outbound Authentications
Authentication requirements should be setup before defining your webhook in the next step.
Navigate to Settings -> Integrations -> Outbound Integrations -> Outbound Authentications
We currently support:
- Basic Authentication
- Bearer Token Authentication
- Signed Token Authentication
- Integration Token Authentication (Salesforce)
- TLS Certificate Authentication (Requires the 'Certificate Store' functionality to be enabled on your account. If it is missing, please reach out to the Puzzel Help Desk to request this feature on your account).
Register a Webhook URL
To register a Webhook,
Go to Settings -> Integrations -> Outbound Integrations -> Webhooks
- Click on
 button on the right to open the New Webhook screen
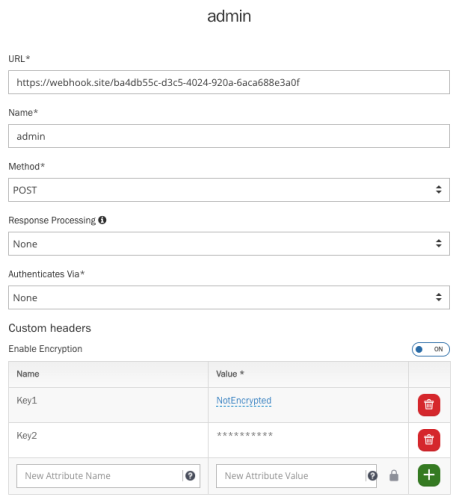
 Enter the Webhook URL, name of the Webhook, Method (POST, GET, PUT, PATCH, DELETE) and Authentication Type. Authentication can be Basic or Bearer token type depending on the destination URL. If no authentication is required, you can choose None from the drop-down menu. If you have configured a Response Mapping, you can set this here, so that a returned JSON response variable can be mapped to a category or form field. See 'Response Mapping' documentation for more information.
- By turning on 'Enable Encryption', you encrypt a value into the custom header. Once you have entered your value, click on the open padlock icon, then click on the green plus button. The value will be encrypted and the unencrypted value is no longer accessible. When the webhook triggers, the encrypted value will be decrypted and sent to the external integration.
- Click Save to register the new Webhook.
You can edit/delete the existing Webhook by clicking on the edit/delete icon against the Webhook.
Define the Schemas
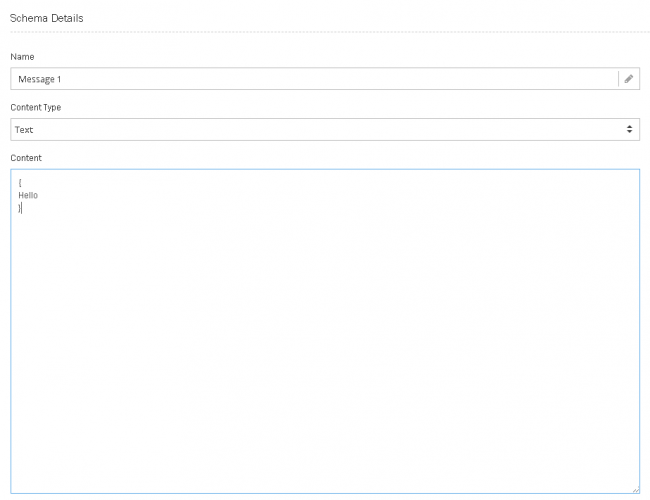
Schema defines the body of the Webhook. This is defined separately to allow you to send different schemas[messages] to the same Webhook[ destination URL]. To create a Schema,
Go to Settings -> Integrations -> Outbound Integrations -> Schemas
- Click on the
 icon to open the Schema Details screen
 Enter the Schema name, Content Type and the body of the content. Content Type can be of Text, JSON, XML format.
- Click Save.
Create Event rule
Event rule can be defined to create a trigger for the message to be sent to the destination URL if an event has occurred. To know more about the Event rules and how to create them, refer to the Event Rules article. To demonstrate the Webhook scenario, an Event Rule can be defined as shown in the picture below.
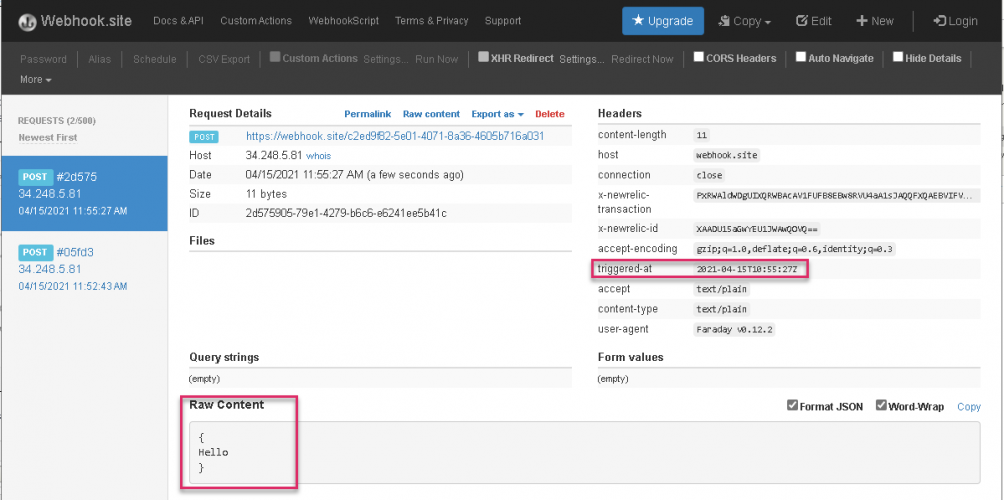
Add a condition which says, if priority of a Ticket has changed, then trigger Test Webhook and send Message 1 to the URL mentioned in the Test Webhook. For demonstration purposes, we have included test Webhook site to show that Message 1 was successfully delivered when a ticket has changed its priority.
2) If no confirmation of delivery is received from the destination URL, it will retry 13 times with an extended delay between each try.
3) There is no guarantee that the Webhooks will be delivered in the same order that it was triggered as it may not be successful first time round.


