
Scheduled tasks/calls
From the Real-time - Queue overview page you can open the Scheduled requests page for a queue by clicking on the number in column Scheduled.
If scheduled callback is offered to your end-customers (ordered from a web page) or if your agents can Schedule calls or tasks from the agent application, a column called Scheduled can be shown in the Queue overview (Users - Products - Queue: Show Scheduled requests).
When a scheduled callback/call/task is ordered (e.g. at 08:58) with a scheduled time (e.g. 12:00), this call/task is put in the selected queue's 'waiting room' and is shown in column Scheduled until the scheduled time, and then it's moved into queue and shown as 'In queue' (In Queue Details).
- When agents create a Scheduled task in the Scheduled tasks tab, they must select a 'task' queue. To configure that a queue with media type email is for Tasks is done on under System queue settings.
- When agents create a Scheduled call in the Scheduled calls tab, they must select a phone queue, but the 'callout' queue and Dialler queues (queue_key starting with "__") can not be selected.
- See more details about the Agent application's Scheduled calls tab here.
A scheduled call's/task's presented wait time and SLA score starts at 0 when it appears in Queue details, but when allocating agents, the time since it was ordered is used to calculate SLA score to make sure it is prioritised at the scheduled time.
The scheduled time can be max 14 days in the future for calls, and max 120 days in the future for tasks. The default max number of requests in a queues 'waiting room' is 1000.
If you click on a number in column Scheduled in the Queue overview, the page Scheduled requests is shown for the selected queue. Here we show one row per request currently in this queue's 'waiting room'.
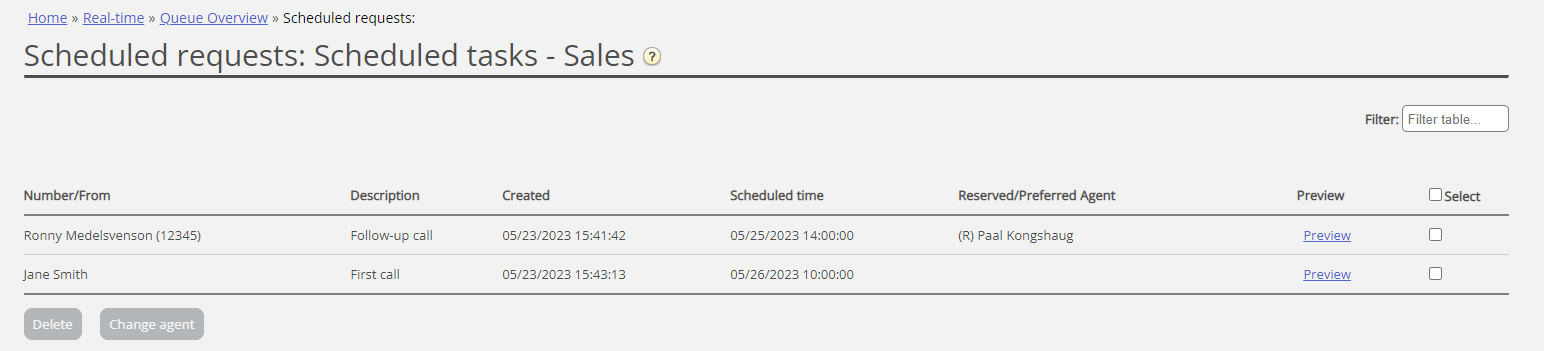
A user who has access to delete requests (emails/callbacks) in queue in the Admin Portal (Users - Products - Queues), will also have access to delete scheduled tasks and edit the reserved agent for scheduled requests/tasks here.
You can select one or more Scheduled tasks (requests) and then click Delete or Change agent.
- If Delete is clicked, you are asked to confirm before these requests are deleted.
- If Change agent is clicked, a new window opens, and here you can add, change or delete reserved agent.
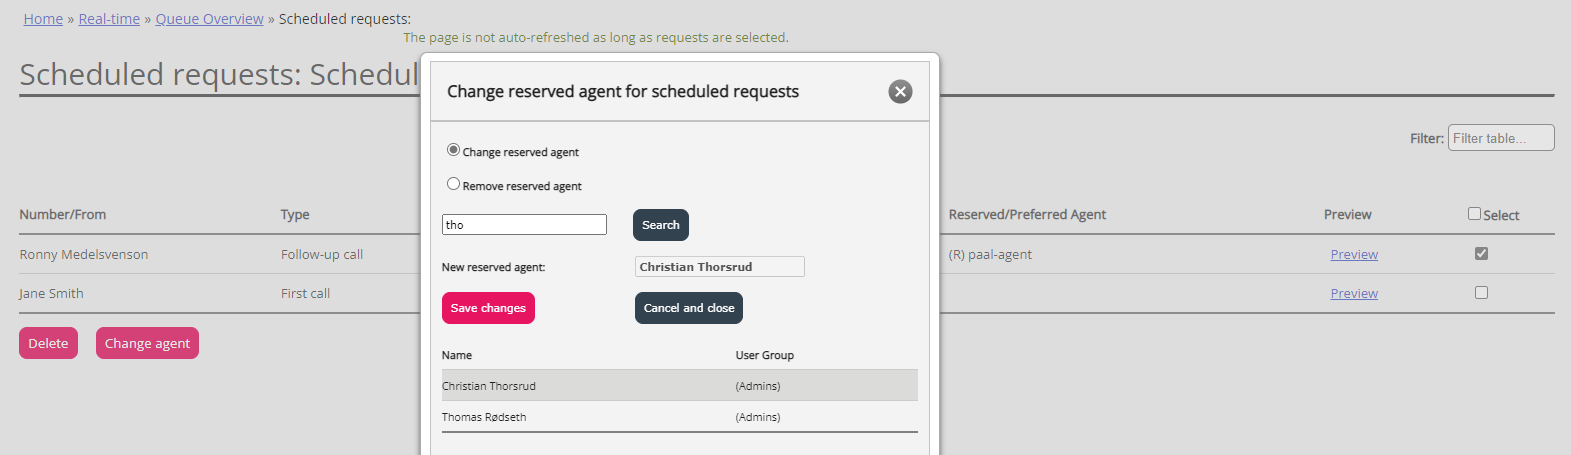
In the popup window...
- If you select Change reserved agent, search for and selects an agent, and then click Save changes, we will set the selected agent as the new reserved agent for the selected request(s), and we will use the new agent’s predefined reserved time (Users Products – Agent application - Scheduled task reserved time in minutes).
- If you select Remove reserved agent and click Save changes, we will remove the reserved agent for the selected request(s).
If you click the Preview link for a Scheduled task, we will show all its details except the Description.